How to Give Your Spindles a Contemporary Facelift
If you’re here, it probably means your spindles are in need of an update. Well, you’re in good company.
Have you ever counted how many times per day do you go up and down your stairs? I currently live in a row home and as a result I probably go up and down the stairs in my home at least 15 times everyday.
Railings are something I think most of us take for granted, until they aren’t there. It’s a great reminder of why it is so important to have functional railings for safety reasons- I know I am not the only one who has taken a little tumble down the stairs, right? But I digress, that’s not really what I am here to discuss today!

Affiliate Disclosure: As an Amazon Associate I earn from qualifying purchases. You should assume the owner of this website has an affiliate relationship and/or another material connection, to any suppliers of goods and services that may be discussed here and may be compensated for showing advertisements or recommending products or services, or linking to the supplier's website.
On to the topic of spindles: Have you ever considered how much the look of your railing and spindles impacts the overall style of your home?
Even if the stairs in your home are somewhat tucked away, I bet they are still visible from many common areas where you spend the most time in your home.
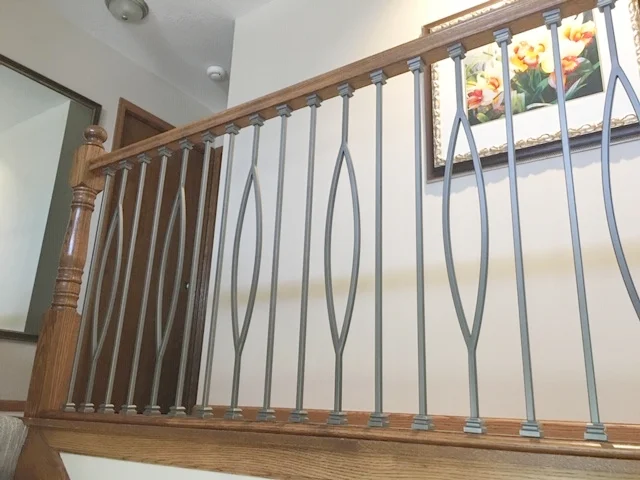
Recently we worked with clients who wanted to refresh their entryway. They had a beautiful two story entryway that was open and had lots of light.
Like many grand entryways, when you walk in the door from outside the very first thing you see is the staircase.
We knew changing the railing would be a way to make a big impact on the overall look of the entryway.
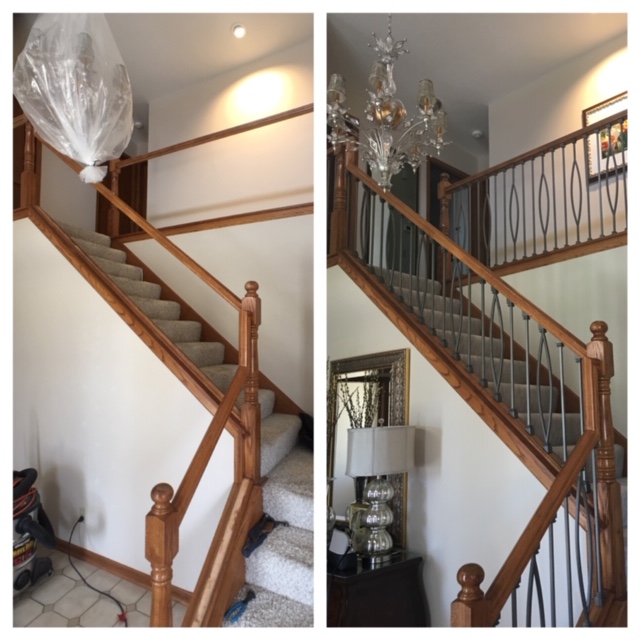
This home was originally built in the 1980’s so the railing and spindles were a stained oak in a cherry mahogany color. They were in excellent condition, but no longer matched the clients’ desired aesthetic for their home.
We got to work brainstorming ways to give their traditional railing an updated look and below are the steps we took and some tips on what to consider if planning a similar project for your own home.

1. Consider the Style of Your Home When Choosing New Spindles
As is common for many people, these particular clients had been remodeling different areas of their home over the last few years. Tackling projects over a number of years makes sense when you are living in the space and budgeting for each project separately.
The trick with remodeling different areas at different times is making sure to keep the look of the home cohesive.
This particular home was not a small one, about 3,500 square feet, and all of the trim and doors in this home were oak in the same color of stain that matched the existing railings. We knew from the beginning that the clients did not want to paint or replace any of the trim if not 100% necessary. So, although there are many different railing options out there, our mission was to make sure there was an updated look while taking into consideration what would look best with the existing trim.
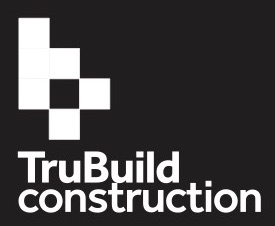
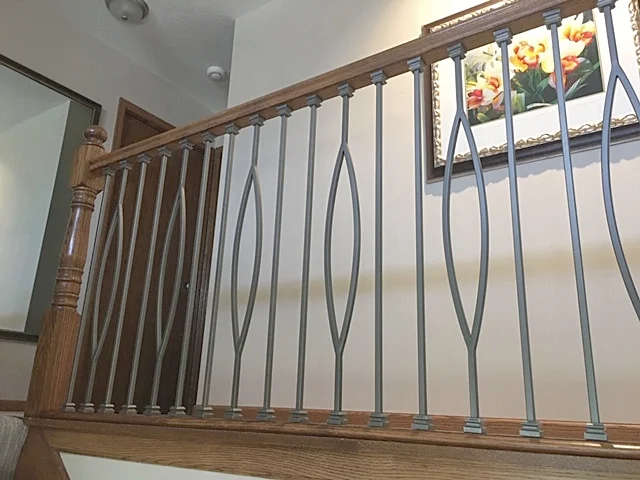
As a result, the clients decided they wanted to keep the existing newel posts and railing in the stained oak to maintain a flow throughout the home. They had been adding gray tones and contemporary shapes to their home with each remodel project which is how they ended up selecting a gray color metal spindle with an elongated oval shape that would complement the other improvements they had made to their property and tie the spaces together.
Similarly, when planning your own remodel, take your style cues from your existing space. If you have made other recent improvements to your home, remember to consider how well your new railings will work together with what is existing in order to make the design more cohesive.
2. Plan For Your Budget When Selecting How To Update Your Spindles
We have found average costs to replace existing railing and spindles to start around $3,500, depending on the size and materials selected.
Replacing only the spindles and not the newel posts or railing was a way that our clients were able to save a lot of money.
It is important to remember that the price of different styles and materials of spindles can vary quite a bit. For instance:
Metal/Iron Spindles or Balusters: Prices start around $10 a piece and go up from there depending on style and finish
Wood Spindles or Balusters: Prices start around $5 a piece and go up from there depending on the style and if they are unfinished or prefinished
Hiring someone to install the new spindles for you will cost money for the labor, so it may be worth reaching out to a local contractor to get an estimate. If this will be a DIY project, the cost will be mostly in the materials you select. In addition, make sure to check the other necessary parts and pieces in Step 5 to help you decide which options will best fit your budget!
3. If You Plan To DIY Your New Spindle Install, Make Sure You’re Confident In Your Skill Level
If DIYing this project is something you plan to take on, make sure to think through the steps carefully before you purchase.
If you choose metal spindles, make sure they are going to be the appropriate size to match your existing railing height. Ordering spindles that are too long may get you into a tricky situation if you don’t have a way to cut them to fit.
If you aren’t a professional, replacing spindles in a wood railing is generally an easier task than trying to replace newel posts and the entire railing.
This is because many times the newel posts, or end posts, of the railing can actually be tied into the framing structure of the home which makes for a much more complicated (and potentially costly) replacement.
4. Double Check That Your New Spindles Will Meet Code
Depending on the age of your home, your existing spindles may be too far apart compared the the current requirements. In general, building code requires that spindles be no more than 4” apart at the widest point.
It should be mentioned that different cities also have different code requirements for vertical versus horizontal railings due to safety concerns. Make sure to check on your city’s website or talk to your city’s building inspector to make sure you know the appropriate requirements before moving forward.
Want to calculate how many spindles you will need in order to meet code?
Here’s how we calculated the number of spindles we needed for each section of railing:
Measure the space between the two newel posts. We drew this on paper so we would be able to visualize the spacing and number of spindles.
Place a spindle in the center of the measurement, then take the space on either side and divide it by the amount of distance you need between each spindle to meet code (in our case, this was 4”)
Most likely you will have a remainder that is less than 4” (or your required distance). This could mean one of the spindles would land too close or too far from the newel posts. In this case, you can adjust the spindles in one direction or another to ensure the spacing looks even and that they will all be at the appropriate spacing to meet code requirements.
In addition to using this drawing to help calculate the number of spindles we needed to order, it was also a useful reference tool when it came time to do the installation. We were able to use it as a way to verify the distances were on point before drilling holes for the spindles.
5. Gather All The Necessary Parts and Install Your New Spindles!
Materials We Used:
Wood for filler pieces on underneath of railing and base of spindles (unfinished or prefinished)
Stain and Polyurethane to match existing (if wood pieces are unfinished)
Wood Putty (color should match the finished stain or paint on wood)
Step 1 - Remove The Old Spindles

Remove existing spindles and center wood trim on the underneath side of the railing and at base of spindles. Use chisel if necessary and be careful not to damage the existing wood railings or newel posts.
Step 2 - Prep The Railings For The New Spindles

Measure where wood trim was removed in railing and base of spindles, cut wood filler pieces to fit
Sand wood filler pieces and wipe clean with damp cloth
Stain (or paint) to match existing wood and apply polyurethane to finish
Step 3 - Install The Wood Pieces For The New Spindles To Sit In

Install wood filler pieces by applying wood glue and then using 18 gauge brad nailer to nail into place
Fill any holes from the nails with wood putty
Measure and mark locations for spindles on new wood filler pieces (top and bottom) according to spindle plan
Drill holes for spindles (note: the diameter of the holes to be drilled is determined by the manufacturer of the spindle)
Step 4 - Install The New Spindles
Slide iron shoe covers onto top and bottom of spindles
Before installing spindles into predrilled holes, apply epoxy into hole (this step was specified by our manufacturer- check to see if this step is necessary for your spindles)
Install spindles into predrilled holes
Tighten shoe covers at top and base of spindles and you’re done!
Conclusion
From selecting a style to best fit the home, to calculating the number of spindles needed; by using these steps we were able to transform our client’s entryway into a welcoming space that accurately represented their style and complemented the home’s aesthetic. We hope this has inspired you to give your own spindles a facelift! If you have questions or want to know more about this project, don’t hesitate to contact us or drop us a line below in the comments.
Have you remodeled your railings? What did you choose and why? We would love to hear from you in the comments below!


